|
|
| 1. Open new image
- 200x200, Transparent, 16 Million Colors. |
| 2. Begin by adding and naming
layers. Go to Layers>Properites. In the box where it says 'Name' put Background.
Leave all settings the same on all new layers for now. |
3. Add new layer and call
it Shadow.
Add new
layer and call it Glass.
Add new
layer and call it Shape. |
| 4. Click 'L' on your keyboard
to open the Layer Control box. Click on the Background layer button and
fill with your choice of background. I have used a textured back for this
tut but there is no limit to what you could use. |
| 5. Go to the Shape layer
and draw yourself a rectangle with the Selection tool. You can make it
antialias if you prefer, I haven't. Fill with plain white. |
| 6. Go to Selections>Modify>Contract
and use 8. Click the Delete key to remove the middle section of the rectangle. |
| 7. With the inside of the
rectangle still selected, go to the Glass layer. Go to Selections>Modify>Expand.
Use 2. |
| 8. Select your foreground
colour, either from one of the colours on your background with the Dropper
tool, or just something you like. I have used 252,210,66. Fill selected
area. |
| 9. With this area still
selected, go to Image>Plugin Filters>Flaming Pear>Blade Pro. Find the preset
named afd-glass and apply. You may need to adjust the radius according
to the size of your rectangle. |
| 10. Deselect and go to Shape
layer. Using the Magic Wand tool, select the white border image. Here you
can use your imagination. I used a preset called Black Glass. |
| 11. Click on the Shape layer
then go to Layers>View>Current Only. Then click on the Glass layer as well.
Only the frame and the glass should be showing at this point. Go to Layers>Merge>Merge
Visible. |
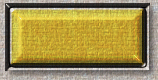
| 12. On the Layer Control
box where it says normal, change to Hard Light. Then click on the Background
button to see your button in action! |
| 13. Now, click on the Merged
layer and using your Magic Wand click anywhere outside of the frame. Invert. |
| 14. Go to the Shadow layer.
Go to Selections>Modify>Contract and use 1. Add a drop shadow to your liking.
I used Black, Opacity 50, Blur 7.9, Offset 4x4. |
| 15. Go to Layers>Merge>Merge
Visible and you're done. |
**HINT** If you save this
bauble before you merge in PSP format, you can add and subtract backgrounds
very easily. Makes a whole lot less work if you change backgrounds and
layouts alot!! And I should know :)
To add text, use the Shadow
layer or create another on top of this but under the glass layer. |